Installation
The easiest way to install SpiegeLib is to use the Python Package Index (PyPI), which is used through the command line with pip. pip comes pre-installed with most python distributions and will automatically install the required dependencies for SpiegeLib.
Currently, the only dependency that cannot be installed using pip is the RenderMan library, which must be installed manually in order to enable programmatic interaction with VST synthesizers. Instructions for installing RenderMan in a virtual environment are provided below (Installing RenderMan in an Anaconda environment).
At this time RenderMan is only available on Mac OSX and Linux operating systems. However, there was recently a pull request made to RenderMan with an update to support Windows, we have not tested this and cannot verify this code at all, but Windows users might be interested in checking that out: https://github.com/DBraun/RenderMan/tree/windows
We recommend installing SpiegeLib inside a virtual environment as the library is still under active development. We recommend Anaconda. Instructions for creating a new Anconda environment and installing SpiegeLib inside of that are provided here.
Requirements
SpiegeLib requires the following:
python >= 3.6
numpy >= 1.18.0
matplotlib >= 3.2.0
librosa >= 0.7.2
tensorflow >= 2.1.0
deap >= 1.3.1
tqdm >= 4.43.0
numba == 0.48
scipy == 1.4.1
librenderman
All of these dependencies, except for librenderman (RenderMan), will be installed automatically. Instructions on installing RenderMan in a virtual environment are provided below.
Anaconda Environment
These instructions show how to install SpiegeLib in an anaconda environment for sandboxed development.
Install anaconda if you don’t have it already. Make sure to install the Python 3 version as SpeigeLib only runs on Python 3.6 and higher.
First, create a new conda environment for SpiegeLib:
$ conda create --name spiegelib_env python=3.7 numpy matplotlib

...

Proceed ([y]/n)? y

...

#
# To activate this environment, use
#
#     $ conda activate spiegelib_env
#
# To deactivate an active environment, use
#
#     $ conda deactivate
At the time of writing, Py-Boost is only supported in python 3.7 or lower, so we’ll specify python 3.7 for this conda environment. Numpy and matplotlib dependencies were also installed here. The other dependencies will be installed by pip.
Activate the environment:
$ conda activate spiegelib_env
(spiegelib_env)$
Now we are working within the conda environment, to leave the environment:
$ conda deactivate
Install SpiegeLib and RenderMan:
The following sections provide information on installing SpiegeLib using pip (pip installation) and installing RenderMan in a conda environment (RenderMan installation)
pip installation
Use the following command to install SpiegeLib using pip from the Python Packaging Index (PyPI). This will also install all dependencies, except for RenderMan.
$ python3 -m pip install spiegelib
If you want to install in an anaconda environment. Make sure you have created a python3 anaconda environment and have activated that environment (See Anaconda Environment)
(spiegelib_env)$ python -m pip install spiegelib
Installing RenderMan in an Anaconda Environment
These instructions are only for Mac OSX currently. They provide information on installing RenderMan in a conda environment on Mac OSX. Please see RenderMan for instructions on regular builds and Linux builds.
librenderman is a python library for programmatically interacting with VST synthesizers. It uses boost-python to wrap a JUCE application.
Install boost-python using conda. Make sure you have activated the conda environment that you want to install librendman into:
(spiegelib_env)$ conda install py-boost
Clone the librenderman repo
We’ve made a small modification to the original RenderMan code to fix an issue with how midi is being sent to synthesizer plugins. Until that change is integrated with the original library we recommend using this forked version of the repository:
$ git clone -b update_midi_buffer https://github.com/jorshi/RenderMan.git
The original repository can be cloned using this command:
$ git clone https://github.com/fedden/RenderMan.git
Open the RenderMan python3 jucer file in ProJucer:
$ cd RenderMan
$ open RenderMan-py36.jucer
Update Xcode exporter
For the Xcode (MacOSX) exporter modify the Extra Linker Flags: remove
-lpython3.6mChange-lboost_pythonto-lboost_python37and add-undefined dynamic_lookup
Update Xcode Debug export
A sub category of the Xcode (MacOSX) exporter is the Debug specific options. Here we want to change the header and library search paths to look for headers and libs in our conda env. The exact location will depend on where your conda environments are on your system, which was determined when you installed anaconda. The default location on MacOSX is/Users/<your-username>/anaconda3.The following instructions will refer to that location, whatever it is on your system, as<path-to-anaconda3>.For the Header Search Paths, remove the existing paths and add<path-to-anaconda3>/envs/spiegelib_env/includeand<path-to-anaconda3>/envs/spiegelib_env/include/python3.7m.Using the default anaconda path: For the Extra Library Search Paths, remove the existing paths and add
<path-to-anaconda3>/envs/spiegelib_env/libUsing the default anaconda path:
VST Search Path
If the VST (Legacy) SDK Folder under the main Xcode exporter tab isn’t filled, you will need to update that. Add the VST3_SDK folder here which is located in the RenderMan root directory.
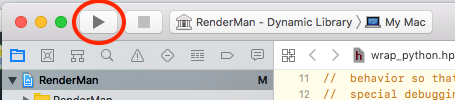
Open Xcode and build
Open Xcode from the Projucer by clicking on the Xcode icon

Build the library in Xcode
Rename the built library and move to conda env:
$ cd <path-to-RenderMan>/Builds/MacOSX/build/Debug
$ mv librenderman.so.dylib librenderman.so
$ mv librenderman.so <path-to-anaconda3>/envs/spiegelib_env/lib/python3.7/site-packages/
Test librenderman. Make sure the correct conda environment is activated:
(spiegelib_env)$ python
>>> import librenderman as rm
JUCE v<Juce version>
>>> engine = rm.RenderEngine(44100, 512, 512)
>>>